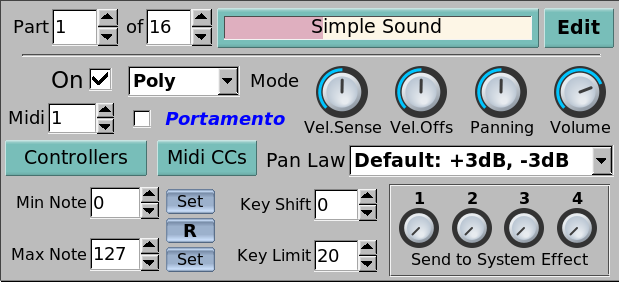
The first control is the part number you are currently looking at, and
alongside this selection is an entry to decide the number of parts available. These are rows of 16, and can be 16 (the default), 32 and 64. Initially the higher numbered ones take the same channel as the matching default ones. This is especially useful for Vector control where a 'column' of up to four parts can be linked and controlled by a MIDI joystick, or similar.
On the same line you then have what is both a shortcut button to open the window for the current selected bank, and (with a right-click) an editable field for the part's current instrument name. Finally, there is an Edit button that opens a new window for detailed part editing.
Below the part number is the switch to enable or disable the entire part, and alongside this is the playing mode. This can be Polyphonic, Monophonic or Legato. Legato is not available if Drum Mode has been set in the Part Kit editing window, and temporarily reverts to Poly with a red warning background.
Just underneath these is the Midi channel it will respond to and the switch to set whether Portamento between notes is allowed.
If the Omni switch is enabled, then the part will listen for events on all MIDI channels instead of only the numbered one.
The four controls to the right set the respective levels for the entire part.
Vel. Sens. This sets the velocity sensitivity to incoming MIDI messages.
Vel. Offs. Velocity offset sets the point at which Yoshimi starts to actually respond.
Pan Is a normal panning control for the part and is directly linked to the one in the mixer.
Volume This is also directly linked to the mixer control for overall part volume.
Controllers button opens the MIDI Controllers window so you can adjust their ranges.
Midi CCs opens a window for the MIDI CCs window for emulating the 5 commonest controls.
Underneath 'Controllers' are the key range controls.
Min Note sets the lowest MIDI key this part will respond to. The Set button alongside sets this to the last note played.
Max Note sets the highest MIDI key this part will respond to. The Set button alongside sets this to the last note played.
R resets both the lowest and highest keys to their default values.
Key Shift provides up to three octaves of key shift in semitone steps.
Key Limit sets the maximum number of concurrent notes for this part.
The four controls at bottom right set the amount of this part that will be sent to each of the System effects (if they are active).
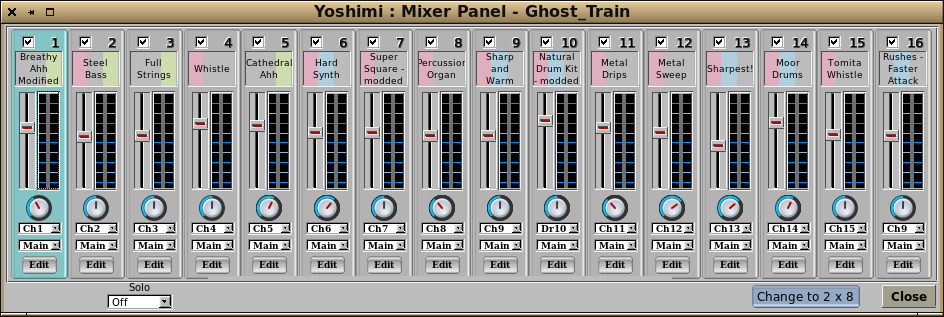
Yoshimi can operate simultaneously across all 16 MIDI channels, so it makes sense to be able to see all of these together, hence the mixer panel shown to the right. The part that is accessible in the main window is shown highlighted in this panel.
This window gives a view of what is happening overall, and allows you to select instrument patches, change volume and panning, as well as selecting the incoming MIDI channel.
If using Jack Audio you also have the ability to decide the audio destination from here.
If more than 16 parts have been enabled, a new menu appears to the left of Solo, to enable you to select which row of 16 that you want to manage. This cut-down image shows both multiple columns, i.e. more than 16 parts, and Solo in the process of being set up.
Mixer controls
(Channel strips)
Check box Clicking on this will turn the part on or off. Turning it on it will also make it the currently selected one.
Instrument (name) As well as showing the name and which engines are used (from the colours) clicking on this will make it the currently selected one, and open the instrument bank window.
Volume Changes the part's volume but doesn't make it the current one. Alongside are the left and right VU meters. A peak overload will produce a red line at the top. As with the main window clicking on the meter will clear this.
Panning Changes the stereo position of this part. Doesn't make it current.
Ch (MIDI channel) Provides a menu for selecting the channel to listen to. Doesn't make the part current.
Main (audio destination) Only when using Jack Audio, allows you to send audio to the main pair, the part ones only or to both. Doesn't make the part current.
Edit Makes the part the currently selected one. A right click also opens the part's Edit window (if it's not already visible).
(Bottom row)
Part Group If more than 16 parts are selected this will let you switch the view to which 'row' you want to manage.
Change to (display format) This gives you the choice of one row of sixteen, or two rows of eight parts.
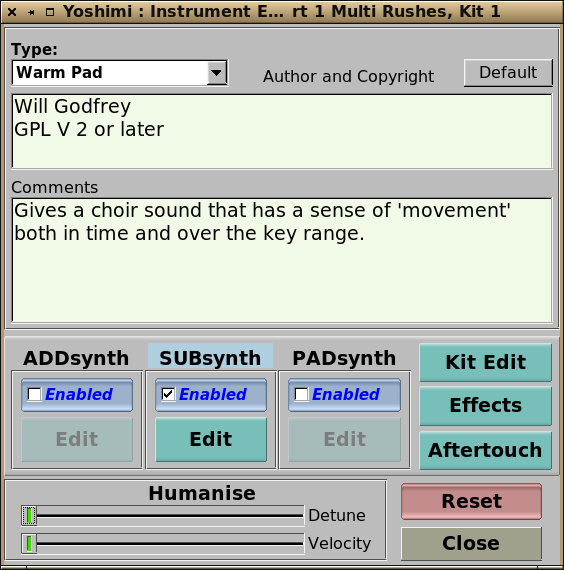
The Edit button mentioned above opens this window for full access to all part instrument editing.
Enabling and disabling the engines is done from here, along with access to them via the respective 'Edit' buttons.
Editor controls
Default This refers to the copyright field below. Clicking on this button will fill the field with a saved entry (if it exists). To store a default message, fill in the entry manually, then while holding down Ctrl click on this button.
Author and Copyright (text entry) A free text field for you to enter whatever copyright information you like.
Comments (text entry) A field for additional comments, such as how the instrument can be modified, where it sounds best etc.
Enabled (AddSynth) Makes this engine active or inactive.
Edit (AddSynth) Opens the AddSynth global editing window.
Enabled (SubSynth Makes this engine active or inactive.
Edit (SubSynth) Opens the SubSynth editing window.
Enabled (PadSynth) Makes this engine active or inactive. If the PadSynth build mode is set to 'Muted' making changes to this may cause disruption to the sound while the PadSynth wavetable is being created.
Edit (PadSynth) Opens the PadSynth editing window.
Detune (Humanise) This control enables you to set a small random detune of the entire part.
Velocity (Humanise) With this control you can set a random whole part attenuation.
Reset This button reverts the part's instrument to the default 'Simple Sound'.
Normally it doesn't change the other part level settings (at the bottom of the main window). However, if you hold down the Ctrl key when hitting the button you can clear the entire part. In either case there is a confirmation message before the action is performed.
Back to top
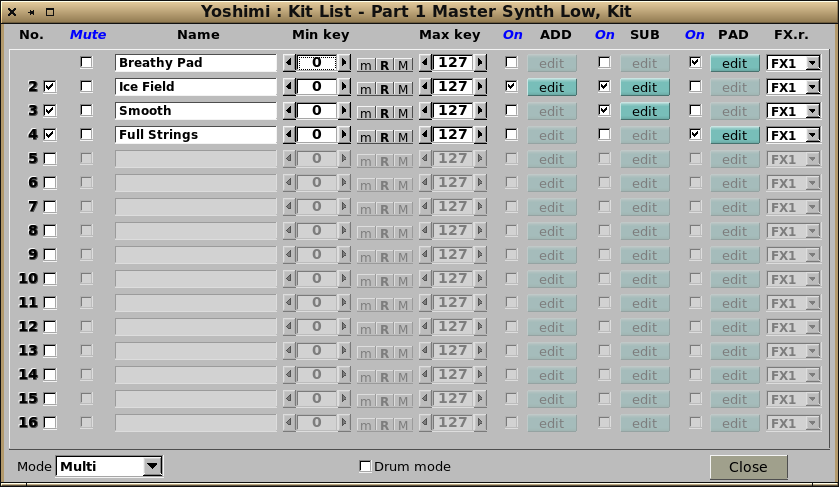
Part kits can consist of up to 16 kit items, each with a full set of engines. Kit items also have their own key range, although this must be within the overall part's range.
Kit controls
(kit item strips)
No. (checkbox) This enables or disables the kit item. It silences the part while doing so as it has to change the total number of engines for that part. If disabling there is a confirmation popup, as this is a destructive change.
Mute Silences this kit item. It has no effect on any other items, or the part overall.
Name Each item can be named independently
Min key The minimum MIDI key number this item will respond to.
m Use the last pressed key to set the minimum key number.
R Reset the key range.
M Use the last pressed key to set the maximum key number.
Max key The maximum key number for this kit item.
On (AddSynth) Enables or disables the item's AddSynth Engine.
Edit (AddSynth) Opens the AddSynth editing window for this item.
On (SubSynth) Enables or disables the item's SubSynth Engine.
Edit (SubSynth) Opens the SubSynth editing window for this item.
On (PadSynth) Enables or disables the item's PadSynth Engine. A first time enabling, will also silence the part as it has to generate a new wavetable.
Edit (PadSynth) Opens the PadSynth editing window for this item.
FX.r. Sets which of the part's three effects will be applied to this item.
Note
Item level Min and Max note ranges are constrained by the overall range set at part level.
e.g Part MIn is 60, Item Min is 40, Resultant Min is 60.
(bottom row)
Mode This menu selects the kit mode that is used.
Multi - All kit items will sound over their full key range.
Single - Only the item that has the lowest min. key will sound over any overlapping ones. Beyond its highest note, the next one with the lowest min. will sound etc.
Crossfade - Pairs of items, i.e. 1/2, 3/4 etc, will fade from one to the other across their overlap key range, without affecting any others.
Drum mode This blocks various pitch modifying controls for this part (such as Key shift, Legato).
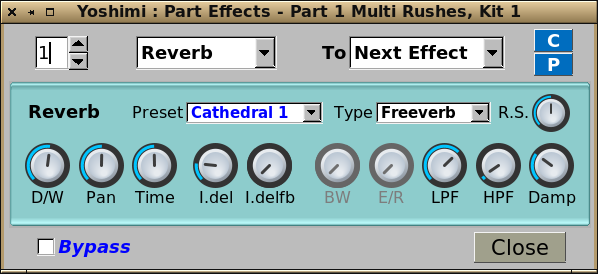
Effects
This is the part level window which selects, contains and manages the individual
Effects and their routing.
The spinbox selects which of three part effects you are managing.
The menu chooses the effect, which will then appear in the area below.
The last menu determines the routing of the effects:
Next Effect (default): will send the output of the effect (added to the incoming signal) to the next one in the chain.
Part Out: makes the current effect the last one in the chain, effectively ignoring any other following effects.
Dry Out: This will send the incoming signal component directly where part effects are added together, so it won't be passed on to later effects. However, the output of the effect itself is passed on to later ones. Consequently, if this effect is bypassed it also effectively bypasses all later ones.
At the bottom of this window is the bypass button to allow you to disable this effect without losing the settings, or altering the routing for the other effects in the chain.
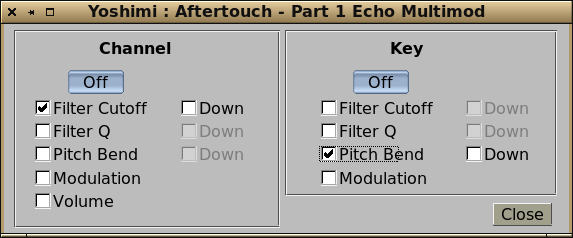
Aftertouch
Each part can have independent Channel, and Key aftertouch. The controls shown operate in parallel to the incoming CCs so you should not use the incoming CC at the same time as aftertouch, otherwise the results can be quite confusing. You can have several of the controls working at the same time, but not on both channel and key at the same time.
The normal range is from the CC value at the time the key was pressed up to the maximum for that control. If 'Down' is set as well, the effect will be in the reverse direction. i.e. down to the control's minimum value.
Note
If two parts such as, part 1 and part 5 are receiving the same MIDI channel, they can still have quite different aftertouch settings.


 The Edit button mentioned above opens this window for full access to all part instrument editing.
Enabling and disabling the engines is done from here, along with access to them via the respective 'Edit' buttons.
The Edit button mentioned above opens this window for full access to all part instrument editing.
Enabling and disabling the engines is done from here, along with access to them via the respective 'Edit' buttons.
 Part kits can consist of up to 16 kit items, each with a full set of engines. Kit items also have their own key range, although this must be within the overall part's range.
 Each part can have independent Channel, and Key aftertouch. The controls shown operate in parallel to the incoming CCs so you should not use the incoming CC at the same time as aftertouch, otherwise the results can be quite confusing. You can have several of the controls working at the same time, but not on both channel and key at the same time.